Table of Contents
Roles - Import of data from CSV
1. Prepare the CSV file
Here is an example of a CSV file which can be used for importing (or updating) roles, setting their role attributes, guarantees (by user, or by role) and criticality, for saving them in a created catalogue and for assigning their subordinate role. To use this CSV file, create a new identity with user name "user-login", and a new role with code "role_code" to set guarantees. Have a virtual system called 'test'.
roles;code;description;attribute;guarantees;guarantee_type;guarantee_role;guarantee_role_type;criticality;catalogue;subroles;eavcode1;eavvalue1;systemname1;systemattr1;systemvalue1
testimportrolename;testimportrolecode;desc;attr1;user-login;;role_code;;4;cat1|cat3;;eav;value;test;rights;testimportrolename
In Excel, it looks like this: 
As you can see roles column can contain single or multiple values (separated by a line; the separator can be specified in the settings of the LRT). For multivalued roles, values from the same row will be added to every role. The only exception here is role criticality which cannot be multivalued. CSV file can have optional number of columns: column names are specified in setup of LRT.
The result of this LRT used with this CSV file should be that one new role testimportrolename (with code testimportrolecode) will be created. It will have these properties:
- description: 'desc'
- attribute: 'attr1'
- guarantee: user with username 'user-login'
- guarantee by role: role with the code 'role_code'
- criticality: 4
- catalogue: it will be in 'cat1' and 'cat3'
- it will have EAV with code 'eav' with value 'value'
- it will create an account on system 'test' and set value of attribute 'rights' to 'testimportrolename'
Create new LongRunningTask
Now we will create the new LongRunningTask (LRT). As shown in the picture, go to Settings → Task scheduler → Scheduled tasks and hit green "Add" button to add new LRT. Select the task Import roles from CSV. (ImportRolesFromCSVExecutor)

Fill all attributes
Now we need to create new LRT with these attributes:
General:
- Upload a CSV file - dropzone to select or drop csv file
- Column with role names - name of the column with roles in csv file
- Column with role codes - name of the column with role codes in csv file; if left empty, the role code is based on the role name, only spaces are replaced by underscores
- Column with description - name of the column with role description, can be also used to update description (if your CSV file doesn't contain descriptions, i.e., you are not setting description for any of your roles, leave this line empty)
- Column with criticality - name of the column with role criticality, can be also used to update criticality (if your CSV file doesn't contain criticality, i.e., you are not setting criticality for any of your roles, leave this line empty); if no criticality is specified, the default is 0
- Column with catalogue names - name of the column with catalogue names, can be also used to update catalogue names (if your CSV file doesn't contain catalogue names, i.e., you are not setting catalogues for any of your roles, leave this line empty)
- Column with subrole codes - name of the column with subordinate roles codes, can be also used to update subordinate roles (if your CSV file doesn't contain subordinate roles codes, i.e., you are not setting subordinate roles for any of your roles, leave this line empty).
- Allow updating subroles - If set to NO, the subroles column will be ignored if the imported role already exists in IdM. Please note that if this field is set to YES, all the direct subroles of the imported roles not listed in the import csv will be unassigned. If the subroles column is not present at all, it'll be treated as if it was empty, i.e. all direct subroles of all roles in the import csv will be unassigned. Subroles deeper in the hierarchy (subroles of subroles and so on) are preserved as long as they themselves aren't in the hierarchy.
- For example if I have roles A, B and C where B is a subrole of A and C is a subrole of B, and I import role A with no subroles, the relation between A and B is removed while the one between B and C is preserved.
- Column separator - separator of columns in csv file (default ; )
- Multi value separator - (Char, default: |) separator of multi valued role names in the csv file, new line separator is default export from excel, but for better clarity of the csv file, it's recommended to use some symbol instead
- Role environment - the name of the environment to which you want to add the role; only supported during creating, not updating roles!
- Can be requested - (Boolean) - Roles can be requested, can be also used to update already imported settings; it allows not selecting value when updating (not when creating!) roles which will not change the Can be requested property of roles. When creating roles, either Yes or No must be selected.
- Skip assignments of sub-roles - If checked, sub-roles won't be assigned to users with assigned parent role (useful for sub-role assignment under roles which aren't assigned to user, available from version 14.6.0)
Role attributes:
- Column with role attributes - name of the column with role attributes, can be also used to update attributes (if your CSV file doesn't contain attributes, i.e., you are not setting attributes for any of your roles, leave this line empty)
- Form definition code - the code for the definition which will contain the added attributes (you only have to fill this if you are setting attributes)
Role EAVs:
You can set value to multiple role EAVs. The mechanism used for this is prefixes which are followed by the order number of the column (e. g., 'eavcode1', where 'eavcode' is the prefix and '1' the order number). The combination of the prefix and the number identifies a column uniquely.
- Prefix of column with name of EAV attribute: Only attributes from the main role definition can be imported and they must of type SHORTTEXT. Supports update (the current value of the attribute will be overwritten if imported).
- Prefix of column with value of EAV attribute
Guarantees:
- Column with guarantee - name of the column with role guarantee by identity login, can be also used to update guarantee (if your CSV file doesn't contain guarantees, i.e., you are not setting guarantees for any of your roles, leave this line empty)
- Column with guarantee types - name of the column with role guarantee by identity type (if your CSV file doesn't contain guarantee types, i.e., you are not setting guarantee types for any of your roles, leave this line empty) (since Extras 2.2.0)
- Update guarantee types - check if you want to add new guarantee type to an existing guarantee (this will create a new guarantee with the selected type, the original one will still exist) (since Extras 2.2.0)
- Column with guarantee role - name of the column with role guarantee by role code, can be also used to update role guarantee (if your CSV file doesn't contain role guarantees, i.e., you are not setting role guarantees for any of your roles, leave this line empty)
- Column with guarantee role types - name of the column with role guarantee by role type (if your CSV file doesn't contain guarantee role types, i.e., you are not setting guarantee role types for any of your roles, leave this line empty) (since Extras 2.2.0)
- Update guarantee role types - check if you want to add new guarantee type to an existing guarantee role (this will create a new guarantee with the selected type, the original one will still exist) (since Extras 2.2.0)
System:
You can set attributes at multiple systems or set multiple attributes in one system. The mechanism used for this is prefixes which are followed by the order number of the column (e. g., 'systemname1', where 'systemname' is the prefix and '1' the order number). The combination of the prefix and the number identifies a column uniquely.
- Prefix of column with system name
- Prefix of column with system attribute codes
- Prefix of column with system attribute values: The attribute has to a multivalued attribute with merge strategy set. It should not contain ":" (colon), see the important note below.
Since module version 14.1.0 15.1.0, you can configure columns for parameters that specify the selection of mapping for linking a role to a system. All of these parameters are optional:
- prefix of column with flag whether the role creates an account on the system: If not set, the default value is true. In import file, you can use values true/false, yes/no, or 1/0 (case-insensitive).
- prefix of column with entity type: If not set, IDENTITY is used by default. Possible values are IDENTITY and TECHNICAL_ACCOUNT.
- prefix of column with account type: If not set, this field remains empty. Possible values are PERSONAL, PERSONAL_OTHER (both are compatible with the IDENTITY entity type), and TECHNICAL (compatible with the TECHNICAL_ACCOUNT entity type).
The entity type and account type act as filters for available mappings. The system selects the first mapping returned by the filter (if multiple mappings match, one is selected essentially at random). The flag for account creation then defines the specific behavior for that link; in previous versions, the default behavior was always used, where the role automatically creates an account on the system.
For example, consider the following import file:
name;code;system1;roleCreatesAccount1;accountType1;entityType1;system2;roleCreatesAccount2;accountType2;entityType2
My role;my-role;Some system;Yes;PERSONAL;IDENTITY;Other system;false;PERSONAL_OTHER;IDENTITY
Set the folowing:
- Prefix of column with system name: system
- Prefix of column with the setting of whether the role automatically creates an account on the system: roleCreatesAccount
- Prefix of column with account type: accountType
- Prefix of column with entity type: entityType
Then, the import
- will create a role with the name 'My role' and the code 'my-role'
- will connect the role with system Some system via provisioning mapping of personal accounts and role assignment will create account on system
- will connect the role with system Other system via provisioning mapping of other personal accounts and role assignment won't create account on system

Run the task
Now we need to hit run.

Now we must go to the "all tasks" panel, select the newly created LRT (check the checkbox), click Operation with selected record and Run selected task.
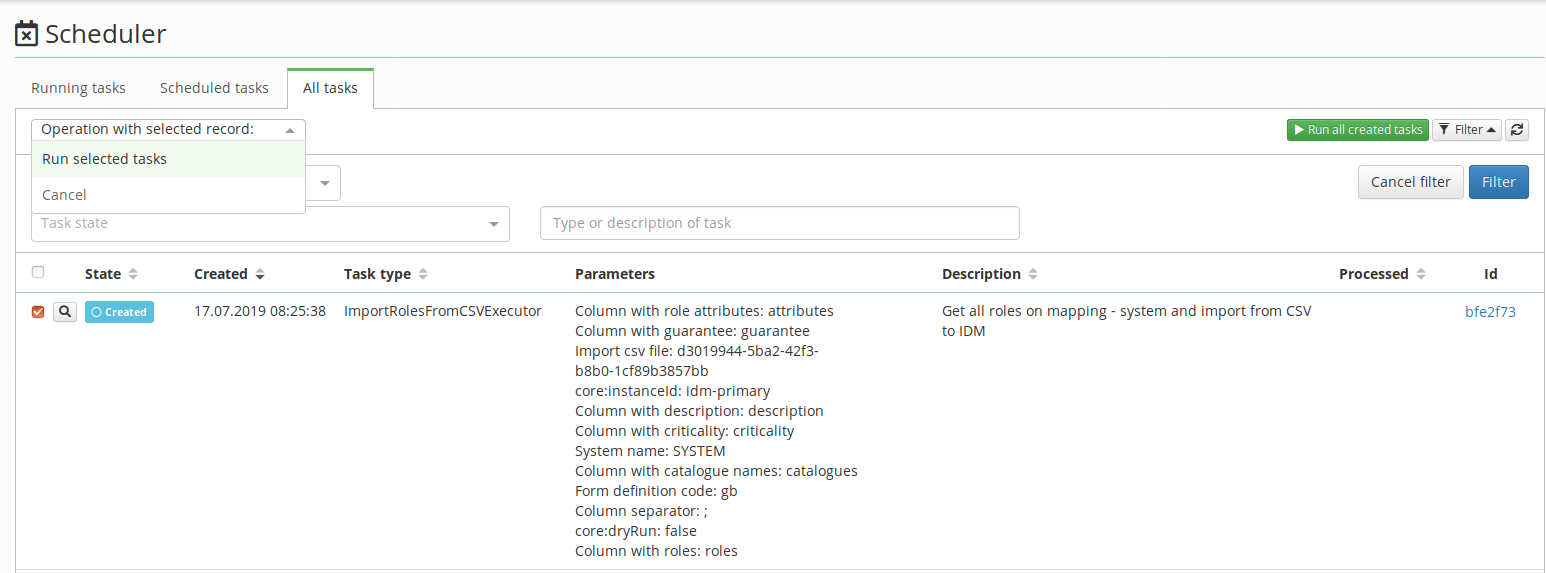
You can also check the status of the created roles there in the task detail. Here you can find information about roles created, updated, or already existing.
At this point, everything should be set up and when the task ends, roles are imported in IdM with their attributes and other imported values, and placed in the catalogue named by the system name.

Known issues
If you delete or upload new file via dropzone, you should delete old files, created from previous uploads.