This is an old revision of the document!
Systems - CSV: Source of identities
Introduction
This tutorial will show you how to connect csv files as a source of users with CzechIdM. We will use the default CSVDirConnector from connid.
Data source
Our sample source file has just three columns that are login, firstname and lastname.
login,firstname,lastname
edwardw,Edward,Williams
adaml,Adam,Lewis
Move your source file onto the server on which IdM is running. It's a good practice to put CSV files of every project into an "import_csv" folder, which you can create in /opt/ dir. Set the owner of the folder and the CSV files to tomcat:tomcat. Set permissions so that the CzechIdM server will be able to read this file. Also, it must be able to write into the folder where the file is located because the connector needs to create temporary files when processing csv into its location. (chmod 750 for folder permissions)
Basic information
Go to the Systems tab in the main menu, then click on the Add button, right above the listed current systems. On the first page, just fill the system name, and since you are connecting csv as a source file, you can set the system as Read-only. Then save the system settings - to make other options available.
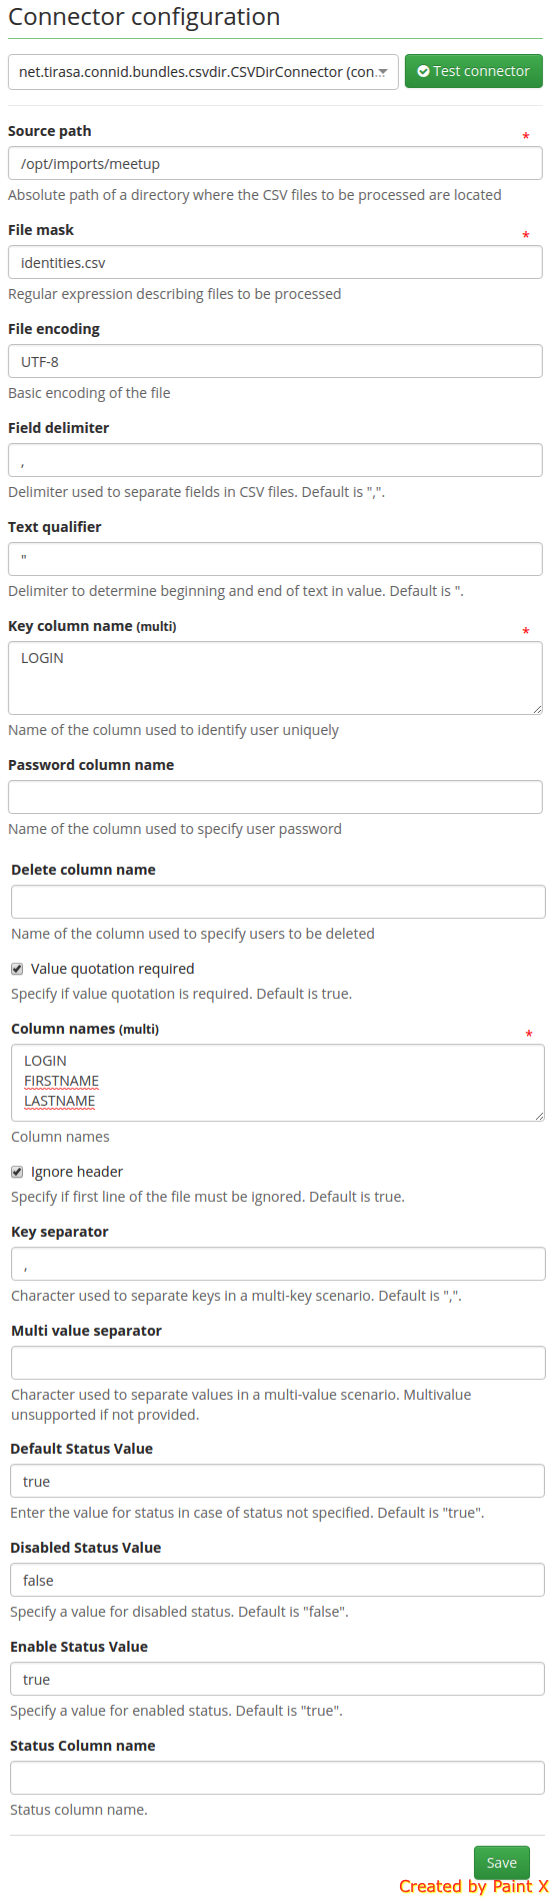
Connector configuration
In the next step, switch to the Configuration tab of your new system. First, you need to choose a connector; in this case, it is the CSV connector. This will present you with the specific configuration for that choice.
Fill the important fields:
- Source path: path to your csv file
- File mask: file name
- Key column name: (multi) - column name of your unique identifier
- Column names: (multi) - All columns of your file including the identifier
- Ignore header: true
Sample configuration for our file: csv_conf_1.png
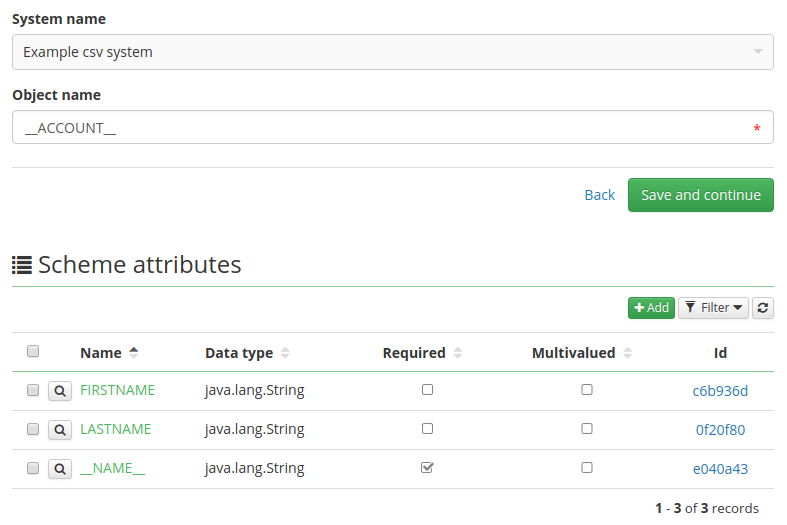
Scheme
Next, go to the Scheme menu item of your selected system.
Have CzechIdM generate a scheme for you by clicking on the Generate scheme button. Alternately, if you want to set everything by yourself:
- Use the Add button to create a new scheme. For users, you need to name it "\_\_ACCOUNT\_\_", because it is Connid constant
- Add all file columns you want to work with. Instead of the name of your identifier column use the Connid constant "\_\_NAME\_\_"
- Set all attributes as Able to read
Sample scheme: csv_conf_4.png
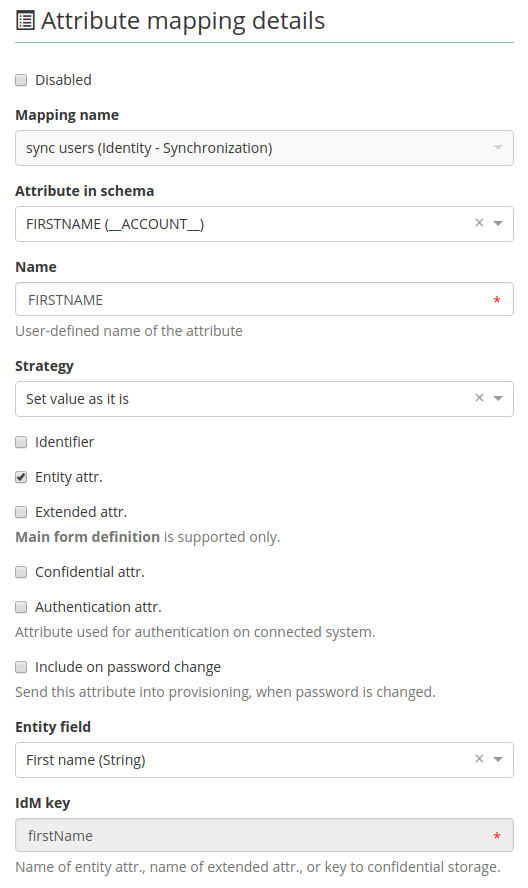
Mapping
Now go to the Mapping menu item. Set how the file data is to be passed to CzechIdM.
First, set the following:
- Operation type: Synchronization
- Object name: \_\_ACCOUNT\_\_
- Entity type: Identity
- As Mapping name set whatever you want to, for example Synchronization of users.
Then map all columns as entity attributes the way you see it in the picture below. Set \_\_NAME\_\_ as an identifier.
Sample attribute mapping: csv_conf_5.png
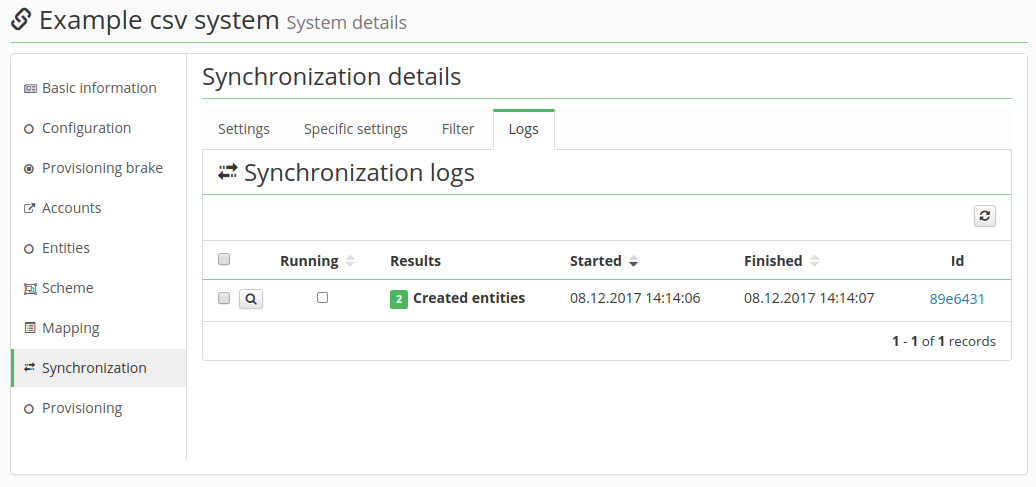
Synchronization
Finally, go to the Synchronization tab and add a new one, setting its Name and the fields as follows:
- Allowed: True
- Reconciliation: True (in this example, we don't use timestamps)
- Set of mapped attributes: Select the mapping from the previous step.
- Correlation attribute: \_\_NAME\_\_
For the rest of the configuration, you can keep the default values.
Afterwards, go back to the Synchronization menu and run the synchronization you've just created. You can check its result if you click on the Logs tab of your synchronization.
Sample synchronization results: csv_conf_6.png
Frequent errors
If the import does not go as expected, these are the things to check out:
- Database connection
- Permission of the folder with CSV files should be set to reading, writing and execution
- Owner of the CSV files and folder, including these files, has to be tomcat:tomcat
Valid CSV:
- Same count of columns in header and in individual records
- No duplicates in identifier that you chose in the system configuration as unique
- No missing unique identifiers
- No empty columns in the header definition