Assign roles to contract EAV - Import of data from CSV
This task assigns roles to contracts. You can either assign roles to every contract of the user, to the main contract, or to a contract specified by contract EAV values.
Prepare CSV file
Here is an example of CSV file which can be used for import role definitions.
login;role;eavname1;eavvalue1;eavname2;eavvalue2;roleattributename1;roleattributevalue1;validfrom;validtill
john;role1,role2;eav1;123;eav2;321;roleAttribute;attributeValue;;2025-12-31
As a result, this task will assign roles with the code 'role1' and 'role2' to a user with username 'john' on a contract which has the value of a contract EAV 'eav1' '123' and 'eav2' '321', if such contract exists. The assignment will be valid from now till 31. 12. 2025. It will also set role attribute "roleAttribute" to value "attributeValue". Note that if no such parameter exists, import task will simply skip this and it wont fail.
If you want to assign roles to the main contract or to all contracts, you only need to specify the username and the roles.
login;role
john;role1,role2
Create new LongRunningTask
Now we will create the new LongRunningTask(LRT). As shown in the picture, go to Settings → Task scheduler → Scheduled tasks and hit green "Add" button to add new LRT.
Fill all attributes
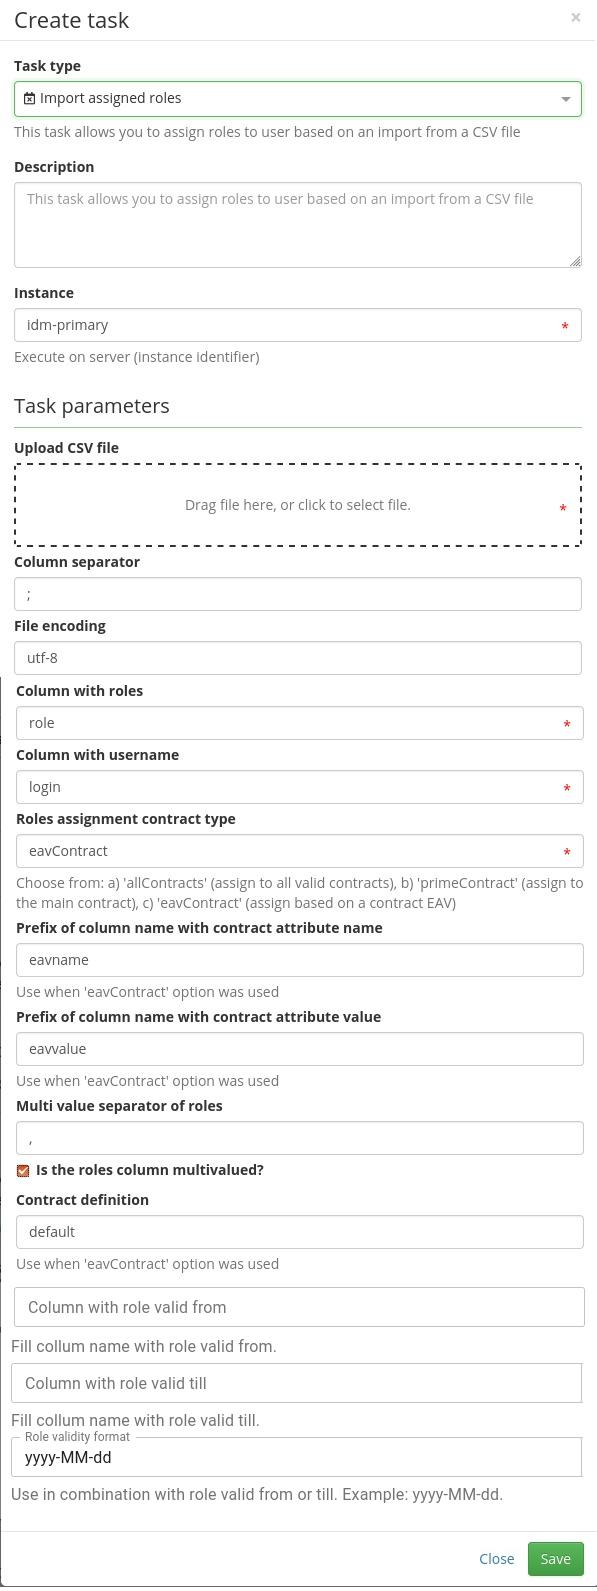
Now we need to create new LRT with these attributes:
- Task type - Import assigned roles
- Column separator - separator of columns in csv file
- File encoding type - insert encoding of your csv file. Default value is UTF-8
- Upload CSV file - dropzone to select or drop csv file
- Column with roles - Name of the column with roles in csv file.
- 5.3.5+ Column with role to remove - name of the column, that defines role to remove
- Column with username - name of the column with username
- Roles assignment contract type - Asign roles to one of the options:
- allContracts - assigns roles to all valid and future contracts
- primeContract - assigns roles to prime/main contract
- eavContract - assigns roles to contract with specified EAV
- Prefix of column name with contract attribute name
- Prefix of column with contract eav code in the csv file. You can use any number of EAV attributes you choose, only make sure to add numbers after the prefix starting with 1. Mandatory if you choose assign to eavContract. (See the first example of a CSV file above.)
- Prefix of column name with contract attribute value
- Prefix of column with contract eav value in the csv file. You can use any number of EAV attributes you choose, only make sure to add numbers after the prefix starting with 1. Mandatory if you choose to assign to eavContract. (See the first example of a CSV file above.)
- Multi value separator - separator of roles column in csv file. This works ONLY for the roles column. You also need to tick the checkbox.
- Contract definition - specify IdmIdentityContract definition code. Use it optionally when you choose to assign to eavContract. The default value is default.
- Prefix of column with the name of the role parameter (optional)
- Prefix of column with the value of the role parameter (optional)
- Column with role valid from (optional) - with this option you have to also fill date format (Example: "yyyy-MM-dd").
- Column with role valid till (optional) - with this option you have to also fill date format (Example: "yyyy-MM-dd").
- Role validity format - default "yyyy-MM-dd". It's required if you set validity of the role assignment.

Run the task
Now we just need to hit run.
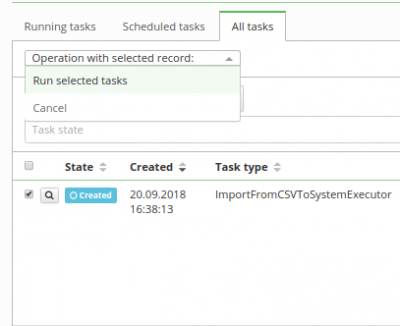
And we also need to process it in all tasks.
You can check status about created role definitions in "all tasks" panel in task detail. Here you can find information about created or already existing automatic role definitions.
Everything should be set up and when the task ends, roles which was in IdM are assigned to contract with eav value same as in CSV.
Role exchange behavior (in extras 5.3.5+)
You can use the LRT to exchange roles (generate a single request to change roles, which removes a role and adds another in the same step). This is useful to for instance exchange a license role for another, without the identity losing access to the licensed software.
To use this behavior, you simply define the "Column with role to be removed" and use it to define the role that needs to be removed. The LRT will only exchange roles for identities that have the role to be removed and it will not do anything with identities that don't have it (it will not even add the roles that are defined in roles to add! )
To explain the exchange behavior, let's use an example. Let's say you are removing role "role_old_license" and adding role "role_new_license":
- Identity1 has role role_old_license → it will get replaced by "role_new_license"
- Identity2 does not have role_old_license → Nothing will happen, Identity2 will not gain the "role_new_license"
Moreover
- Identity3 already has role_new_license → Nothing will happen, Identity3 will not lose the "role_old_license"
- Identity4 does not have role_new_license, but it cannot be assigned due to form projection - role catalogue restriction → Nothing will happen, Identity3 will not lose the "role_old_license"
- Identity5 has multiple assignments of role_old_license → Nothing will happen, it is not clear what assignment should be removed, so no removal is done and therefore no assignment is done too
Known issues
If you delete or upload new file via dropzone, you should delete old files, created from previous uploads.

