Systems - AD: Manage users - Wizard
Introduction
This manual is written for CzechIdM version 10.8 LTS. If you have older version, update it first. Notes about issues when you use older version is described in section wizard in CzechIdM version 10.7.x
You can also use instructions for connecting AD without wizard.
More information about wizard itself is on specific documentation page.
Using Wizard to establish connection
Starting wizard
- In left menu, go to the Systems. In right pane, click on Add.
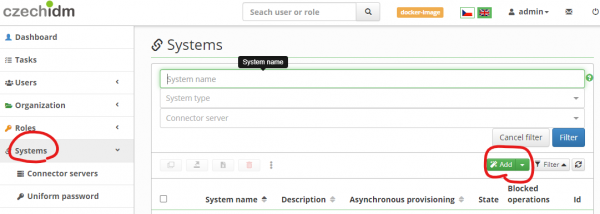
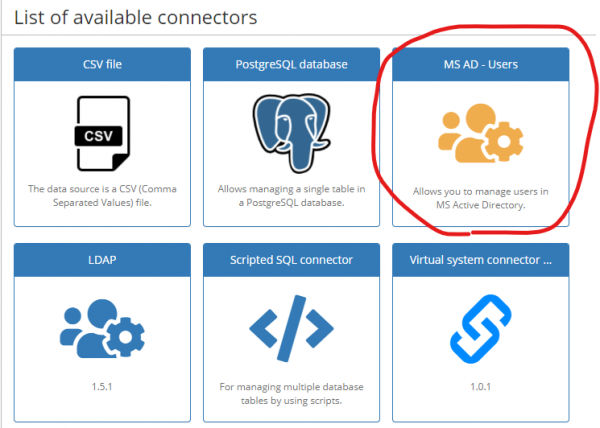
- You will be offered list of connectors. Choose MS AD - Users.
Step 1 - Connection to AD
- You have started the wizard which will help you with initial settings. You need to fill all fields
- System name - it is prefilled by default.
- Host - IP or hostname of target Active Directory (hostname is recommended)
- Port - set as 636 as default (can be set as 389 if not using SSL).
- User - IdM's system user which have sufficient rights to perform user account provisioning actions on AD. It is recommended not to use root, but to create dedicated user account.
- Password - Password for the user
- Once you filled all the information, click on Next. CzechIdM will try to login.
- In case of probles it will give you warning message like in screenshot below, if something is wrong. You need to correct values to ensure connection can be established.
- If you cannot see host, you need to edit /etc/hosts in iam-appliance to fill host and IP active directory → for example 172.31.255.180 lion.zoo.bcv
- another solution is to add the IP address and hostname into the file data/registry/node-active-config/docker-compose-czechidm.yml, like in the example below:
extra_hosts:
  "lion.zoo.bcv:172.31.255.180"
- Once connection is established, wizard will let you continue to next step.
Step 2 - Certificate
- Next step will test certificates.
- If certificates from target system are not trusted by CzechIdM, you will see following message

- In such case, CzechIdM will try to locate certificates on system to be connected and offer them to you. In standard appliance you need to copy them to Appliance to folder
/data/volumes-shared/cacertson server with appliance and restart CzechIdM for it to accept the certificates. If you have custom installation of CzechIdM you need to ad the certificates to the truststore and restart the application (CzechIdM or connector server - depends on where the connector is located).
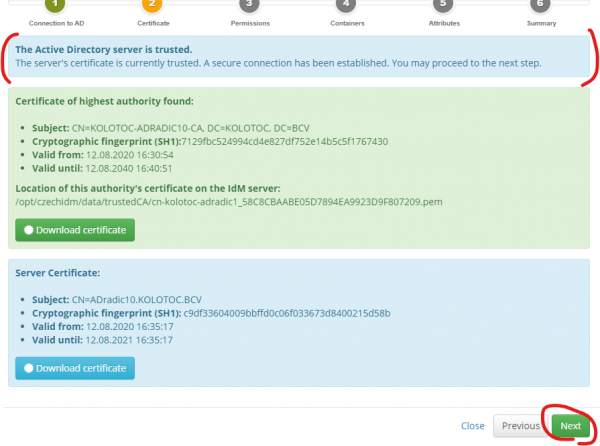
- After certificates are accepted and you refresh browser, you will see following message. CLick on Next.
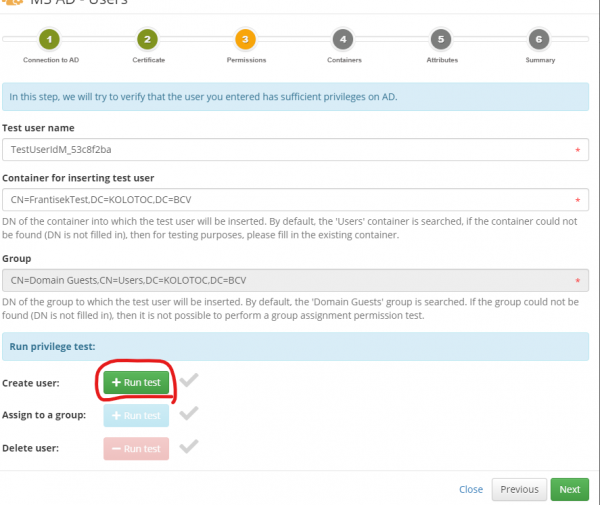
Step 3 - Permissions
- You get to third step of wizard. This step is testing rights of the userId which CzechIdM will use - it can be skipped, but it is recommended to test at least Create User and Delete user.
- Test user name is generated by random and can be changed.
- Container for inserting test user should be changed in accordance to where IdM is allowed to create users. This will also be used as prefilled default in next step.
- Once done, click on Run test button next to Create user.
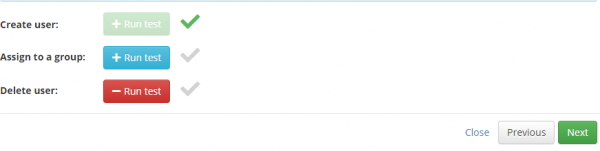
- If it failed, you need to find the error - most probably some typo in settings before or not proper rights for user account, which CzechIdM use. Once corrected, you should see following screen, which confirms the user creation test as succesful
- As you cannot set the Groups, test for "assign to a group" is only working if the prefilled path is exactly matching rights of IdM's user.
Last step in test is to Run test on Delete User. By that you both confirm that IdM's user has proper right and remove this test user from environment. Then click Next.
Step 4 - Containers
- Containers step of wizard allows you to make special definition how IdM should handle users on AD (Active Directory).
- Container with existing user - place from which users should be synchronized
- Container (OU) for creating new users - place where new users should be created when properly requested in IdM.
- Activate Protected Mode - enable this option if users which are blocked/terminated in IdM should be moved to specific container and disabled. You need to specify target container in Container (OU) for blocked/terminated users.

- Note: Values in the containers will depend on the structure in your Active Directory. You can get the value in AD in properties of an organizational unit. If you don't have an organization unit/s, you will need to create it/them in AD.
- You can use a remote dekstop software to connect to your Active Directory
- Click Next after all is set as needed.
Step 5 - Attributes
- Last part of wizard with settings is most complex (step 6 is only informative). It defines all attributes which should be handled by IdM. It is prefilled by all common attributes and they are set to use default transformations.
- You should go through details (magnifying glass icon to the left of attribute name) of every attribute and check if all are valid.
- If the attibute is not used, disable it (in details) or delete it - for that mark checkbox left of magnifying glass and select delete in new window which will appear - then confirm yes in new window.
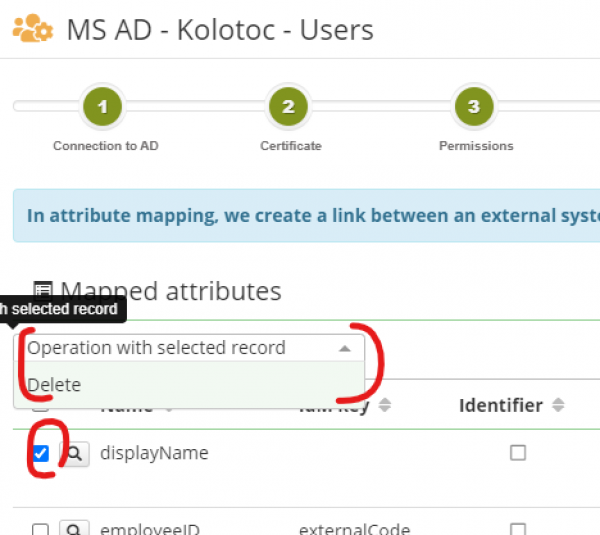
- Once all is checked, corrected and/or deleted/disabled, click Next
Step 6 - Summary
- Final step confirm succeful setting of AD connection and offers creation of role to assign this system.
- Click Finish to end the wizard.
Wizard in CzechIdM version 10.7.x
It is strongly recommended to update CzechIdM, because wizard in older version contained bugs.
They are following:
- You cannot set schema to ACCOUNT objects in wizard. It is set to GROUP automatically and cannot be changed. You will need to finish wizard without mapping and then afterwards delete mapping and create it again manually outside of wizard.
- When you go to see and edit details of any attribute during mapping in wizard, the wizard is terminated and you go to settings instead
Outside of these bugs, there are also improvements done:
- older version of wizard lacked tests for account used to connect IdM
- older version had less attributes created by default, so you must create them manually
- attriutes in older version were created without "transformation to" filled. It is no filled in some cases where it is standard.